How to Add Users, Restrict Access, and Configure Supplier Notifications
Date Updated: January 2, 2025
Got new team members or need to tweak who sees what? No problem! This guide will show you how to add users, set access levels, and configure supplier notifications in TicketingHub. It’s like being the captain of your ship—delegating tasks while keeping everything under control. Let’s dive in!
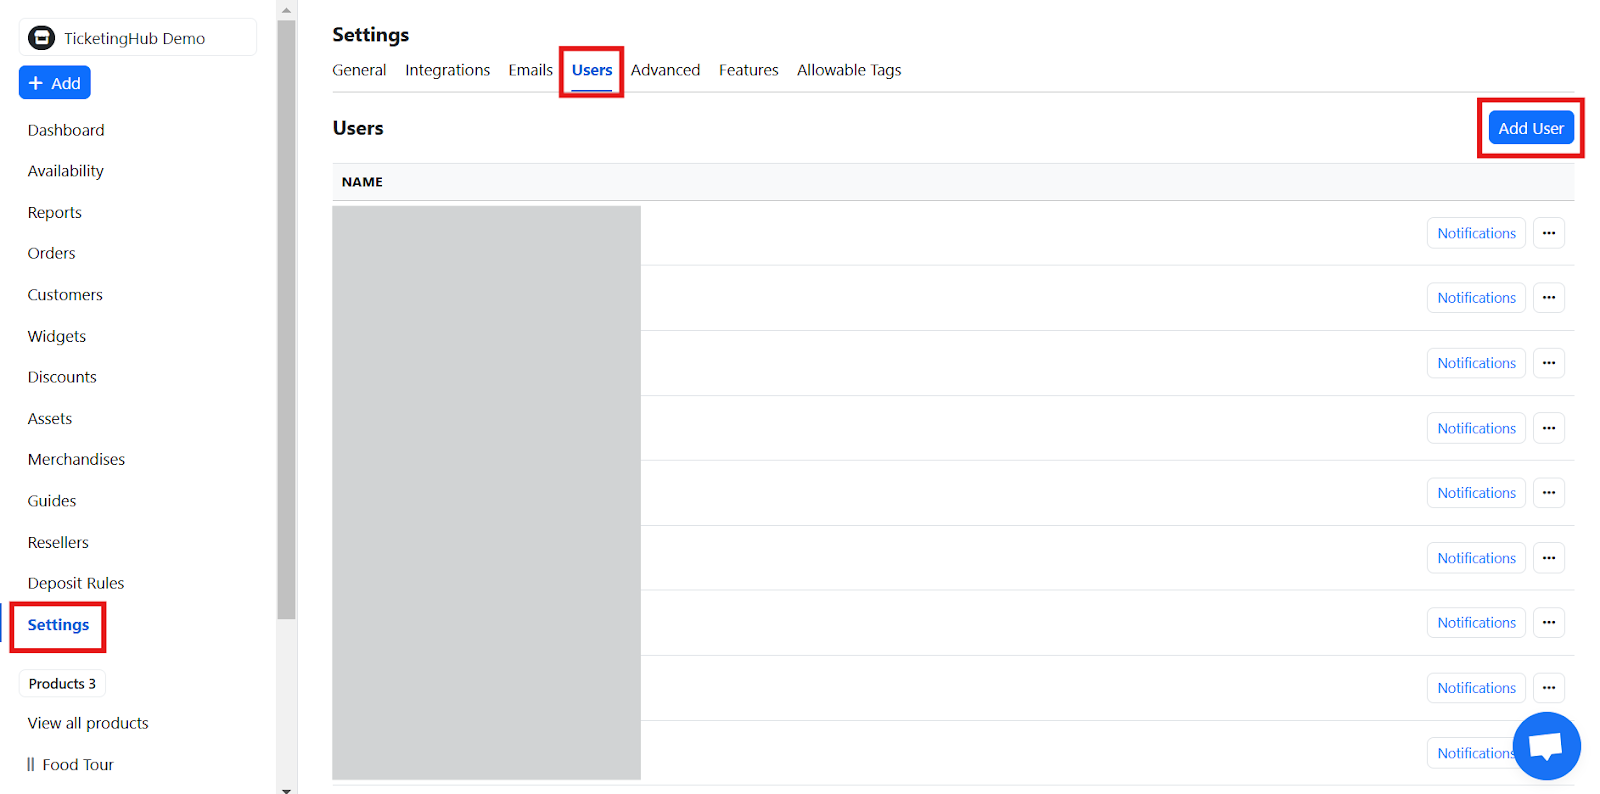
Go to Settings, then click on Users from the top menu.

Click on Add User in the upper-right corner of the dashboard.

Fill in the new user’s name and email address.
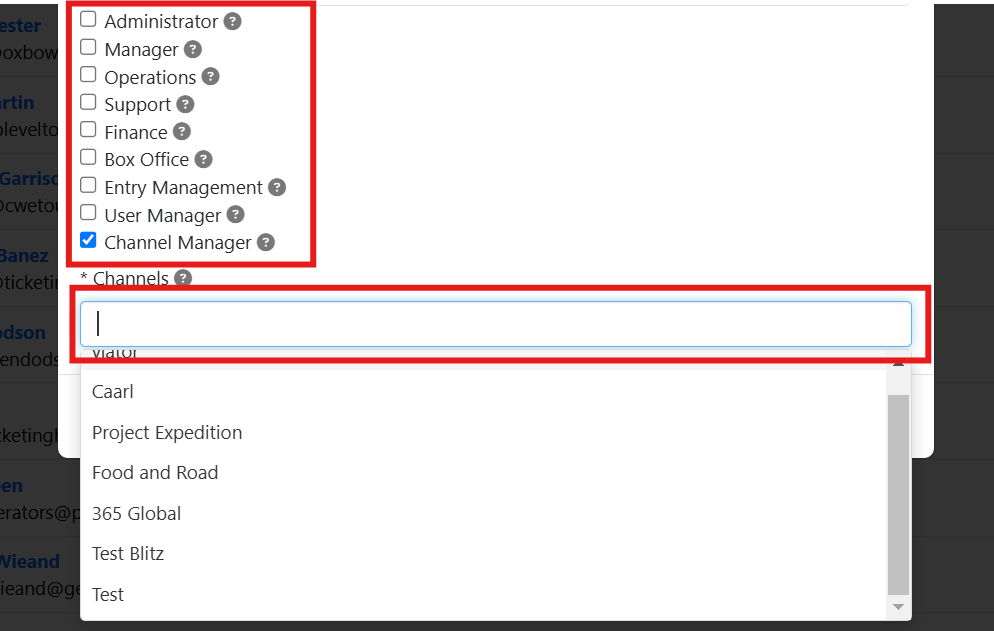
Select the appropriate role for the user based on their responsibilities:

Administrator: Full access, including settings and user management.
Manager: Similar to Administrator but cannot alter or delete users.
Operations: Focused on availability, customers, and existing products.
Support: Handles bookings, customers, resellers, and communication.
Finance: Manages reports, payments, and financial data but can’t manage bookings.
Box Office: Deals with bookings, resellers, and existing products.
Entry Manager: Handles entry-related tasks.
User Manager: Manages users for the supplier account.
Channel Management: Oversees reseller websites.
If you select Channel Manager, a prompt will appear allowing you to assign specific channel(s) for this user to handle.
Click Create User to save the changes.
The new user will receive an automated email with instructions on how to set their password.
And there you have it—your team is set up and ready to roll! With the right access for everyone, you’re not just managing; you’re mastering. Now go ahead and conquer those bookings!
Got new team members or need to tweak who sees what? No problem! This guide will show you how to add users, set access levels, and configure supplier notifications in TicketingHub. It’s like being the captain of your ship—delegating tasks while keeping everything under control. Let’s dive in!
| How to Add Users, Restrict Access, and Configure Supplier Notifications |
|---|
| 1. Navigate to the User Settings |
| 2. Create a New User |
| 3. Enter User Details |
| 4. Assign Access Level |
| 5. Save the New User |
Steps to Add Users, Restrict Access, and Configure Supplier Notifications
1. Navigate to the User Settings
Go to Settings, then click on Users from the top menu.
2. Create a New User
Click on Add User in the upper-right corner of the dashboard.
3. Enter User Details
Fill in the new user’s name and email address.
4. Assign Access Level
Select the appropriate role for the user based on their responsibilities:
Administrator: Full access, including settings and user management.
Manager: Similar to Administrator but cannot alter or delete users.
Operations: Focused on availability, customers, and existing products.
Support: Handles bookings, customers, resellers, and communication.
Finance: Manages reports, payments, and financial data but can’t manage bookings.
Box Office: Deals with bookings, resellers, and existing products.
Entry Manager: Handles entry-related tasks.
User Manager: Manages users for the supplier account.
Channel Management: Oversees reseller websites.
If you select Channel Manager, a prompt will appear allowing you to assign specific channel(s) for this user to handle.
5. Save the New User
Click Create User to save the changes.
The new user will receive an automated email with instructions on how to set their password.
And there you have it—your team is set up and ready to roll! With the right access for everyone, you’re not just managing; you’re mastering. Now go ahead and conquer those bookings!
Updated on: 02/01/2025
Grazie!
